 English
 Français
 Español
 Deutsch
 Italiano
 العربية


tel
:+86-755-86961139
E-mail
:sales@vivo-light.com


Per ottenere immagini nitide delle vene con il tuorilevatore di vene a proiezione, È essenziale seguire le migliori pratiche. Impostare correttamente il dispositivo e garantire il comfort del paziente migliora significativamente la qualità dell'immagine. Aderendo a un piano strutturato e conoscendo l'imaging HD e i controlli in tempo reale, è possibile ottenere risultati costanti.
La ricerca indica che l'utilizzo di dispositivi di visualizzazione delle vene comevivolightconsente agli infermieri di individuare le vene al primo tentativo, riducendo così il disagio del paziente.
| Metrico | Valore |
|---|---|
| Accordo sulla verità fondamentale | 97,7% (p < .001) |
| Sensibilità del dispositivo | 94% |

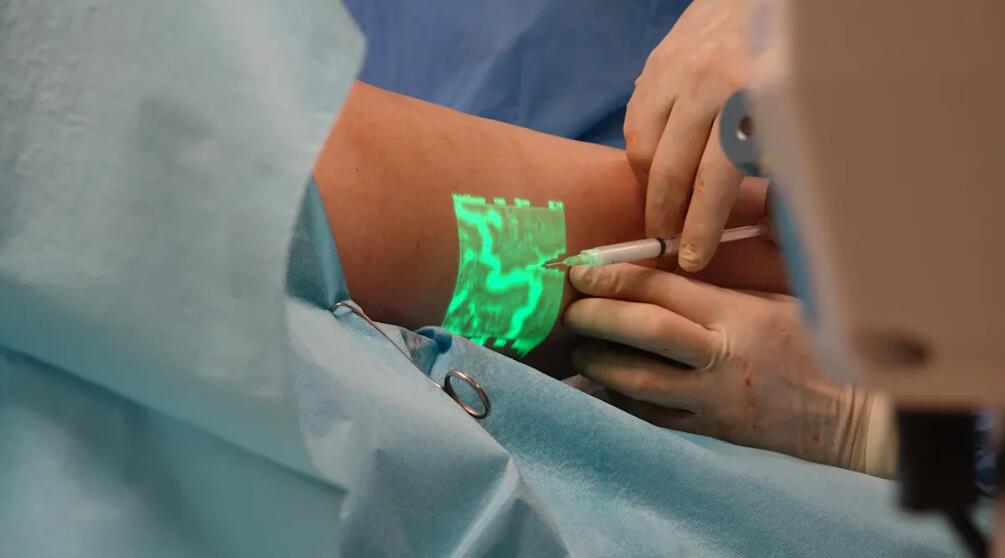
Dispositivo di ricerca delle vene a proiezione infrarossa Vivolight V800P
Assicuratevi sempre che il vostro rilevatore di vene a proiezione sia pulito. Se sulla lente sono presenti polvere o impronte digitali, l'immagine potrebbe risultare sfocata. Questo rende le vene più difficili da vedere. Utilizzate un panno morbido che non lasci pelucchi per pulirlo. Ripetete questa operazione prima di utilizzare il dispositivo ogni volta. Mantenerlo pulito aiuta a ottenere immagini migliori.
Anche la calibrazione è molto importante. Il produttore consiglia di calibrare il dispositivo frequentemente. Questo mantiene la proiezione e la visualizzazione delle vene corrette. Quando si calibra, l'immagine corrisponde alle vene reali. Questo aiuta a evitare errori e garantisce anche la sicurezza dei pazienti.
Suggerimento: imposta un promemoria per controllare la calibrazione all'inizio di ogni turno o dopo aver spostato il dispositivo da un posto all'altro.
Controlla la batteria prima di iniziare. Se la batteria è scarica, il dispositivo potrebbe spegnersi o oscurarsi. Carica sempre il dispositivo prima del turno. Assicurati di controllare l'indicatore della batteria.
Anche la sorgente luminosa è importante. Molti rilevatori di vene a proiezione consentono di modificare la luminosità. È possibile renderla più o meno intensa per diversi pazienti. Ad esempio:
| Popolazione di pazienti | Vantaggi dell'intensità luminosa regolabile |
|---|---|
| Pediatric | Rende più facile vedere le piccole vene e ti aiuta a trovarle più velocemente |
| geriatrico | Aiuta a trovare le vene difficili da vedere e riduce i problemi con l'inserimento del catetere |
Scegli un dispositivo con una lunghezza d'onda infrarossa di almeno 850 nm. Questo ti aiuta a vedere meglio le vene e a ottenere immagini più nitide. I dispositivi leggeri e facili da trasportare sono utili. Puoi usarli in molti luoghi. I cercavene portatili ti aiutano a trovare rapidamente le vene, anche se sono difficili da vedere. Puoi usarli al pronto soccorso, in ambulanza o al capezzale del letto. Questo semplifica il tuo lavoro e ti aiuta a seguire le migliori pratiche ogni volta.
Suggerimento: spegnere o abbassare la luminosità di schermi o monitor nelle vicinanze del paziente. Questo riduce i riflessi indesiderati e aiuta gli occhi a concentrarsi sull'immagine proiettata della vena.
È sempre necessario mettere a proprio agio il paziente prima di iniziare. Chiedere al paziente di rilassare il braccio o la gamba su una superficie piana. Sostenere l'arto con un cuscino o un asciugamano arrotolato, se necessario. Questo mantiene la zona stabile e aiuta a evitare movimenti durante la scansione. Quando il paziente si sente al sicuro e rilassato, è possibile individuare le vene più velocemente e con meno difficoltà.
| Descrizione della prova | Impatto sul comfort del paziente e sul tasso di successo |
|---|---|
| I rilevatori di vene a proiezione riducono il dolore e l'ansia dei pazienti. | Percentuali di successo al primo tentativo più elevate ed esperienze migliori durante la venipuntura. |
| La tecnologia di visualizzazione delle vene riduce del 52% le punture degli aghi. | Meno stress per i pazienti e ridotta paura degli aghi. |
| Una localizzazione più rapida delle vene comporta un minore stress sia per i pazienti sia per gli operatori sanitari. | Aumenta la probabilità di successo della venipuntura al primo tentativo. |
È fondamentale seguire sempre le buone pratiche per la preparazione del paziente e dell'ambiente. Questo aiuta a ottenere immagini nitide e migliora l'esperienza sia per te che per il paziente.
È possibile ottenere immagini venose più nitide tenendo il rilevatore di vene a proiezione alla giusta distanza e angolazione. La maggior parte dei dispositivi funziona meglio se posizionati a circa 30 centimetri dalla pelle. Questa distanza aiuta il dispositivo a mettere a fuoco e a proiettare un'immagine nitida. Se si tiene il dispositivo troppo vicino o troppo lontano, le vene potrebbero apparire sfocate o allungate.
Prestare attenzione anche all'angolazione. Tenere il dispositivo dritto sopra l'area da scansionare. Inclinando il dispositivo, l'immagine potrebbe risultare distorta. Muovere lentamente il dispositivo e regolare l'angolazione fino a visualizzare chiaramente le vene. L'utilizzo di queste buone pratiche aiuta a individuare rapidamente le vene e a ridurre gli errori.
Suggerimento: contrassegna la distanza ideale sul tuo dispositivo con un piccolo adesivo. Questo ti aiuterà a ricordare dove tenerlo ogni volta.
Il movimento può rendere difficile ottenere un'immagine nitida. Se il paziente si muove o se si muove eccessivamente il dispositivo, le vene potrebbero apparire sfocate o saltellare sullo schermo. È consigliabile chiedere al paziente di rimanere fermo e di rilassare il braccio o la gamba. Se necessario, sostenere l'arto con un cuscino o un asciugamano arrotolato.
I moderni rilevatori di vene utilizzano laser ad alta velocità nel vicino infrarosso (NIR) e frequenze di aggiornamento delle immagini elevate. Queste caratteristiche contribuiscono a mantenere l'immagine nitida, anche in presenza di piccoli movimenti. Nella tabella seguente è possibile osservare l'efficacia di queste caratteristiche:
| Caratteristica | Impatto sulla qualità dell'immagine |
|---|---|
| Laser NIR ad alta velocità | Consente un'elaborazione nitida delle immagini e una scansione rapida. |
| Velocità di aggiornamento delle immagini elevate | Previene ritardi o distorsioni, adattandosi ai movimenti del paziente. |
È comunque importante cercare di mantenere sia il dispositivo che il paziente il più fermi possibile. Questo facilita l'individuazione della vena corretta e aumenta le probabilità di successo.
Preparare la pelle aiuta a ottenere immagini migliori. Pulire l'area con una salvietta imbevuta di alcol per rimuovere oli, lozioni o sporco. Asciugare la pelle prima di utilizzare il dispositivo. La pelle lucida o grassa può riflettere la luce e rendere le vene più difficili da vedere. Se la pelle è molto secca, è possibile utilizzare una piccola quantità di crema idratante, ma assicurarsi che sia completamente assorbita prima della scansione.
Dovresti anche controllare la presenza di tatuaggi o cicatrici. Questi possono bloccare la luce infrarossa e rendere più difficile la visualizzazione delle vene. Cerca di eseguire la scansione su un'area con pelle pulita e sana, quando possibile.
Nota: una buona preparazione della pelle è parte delle buone pratiche per l'utilizzo di un rilevatore di vene a proiezione. Aiuta a ottenere risultati accurati e garantisce la sicurezza del paziente.
A volte potresti vedere immagini sfocate o sbiadite quando usi il tuo rilevatore di vene a proiezione. Questi problemi possono rendere difficile individuare rapidamente le vene. Puoi risolvere la maggior parte di questi problemi verificando alcuni fattori chiave:
Suggerimento: prova ad abbassare le luci della stanza e a chiudere le tapparelle. Tieni il dispositivo alla distanza e all'angolazione consigliate per ottenere un'immagine più nitida.
Se l'immagine continua a essere sfocata, pulire la lente e verificare la presenza di macchie. Assicurarsi che il dispositivo sia calibrato. È anche possibile chiedere al paziente di rimanere immobile e rilassare l'arto. Questo aiuta il dispositivo a creare un'immagine stabile e nitida.
Potresti notare che i rilevatori di vene funzionano in modo diverso a seconda della tonalità della pelle. La pelle scura o riflettente può talvolta rendere le vene più difficili da vedere. Il dispositivo potrebbe richiedere un rapporto segnale/rumore (SNR) più elevato per visualizzare immagini nitide. L'SNR misura la capacità del dispositivo di separare l'immagine della vena dal rumore di fondo. Un SNR più elevato offre un'immagine più nitida.
Studi clinici dimostrano che i tassi di successo al primo tentativo possono variare a seconda del colore della pelle:
| Colore della pelle | Tasso di successo al primo tentativo | Probabilità di successo rispetto alla pelle chiara |
|---|---|---|
| Pelle chiara | 75% | 1,00 (gruppo di riferimento) |
| Pelle scura/media | 73% | 0,38 |
Puoi migliorare i risultati regolando la luminosità del tuo dispositivo. Prova a scansionare da diverse angolazioni per ridurre i riflessi. Pulisci e asciuga la pelle prima di scansionare. Se i problemi persistono, spostati in un'area con meno riflessi o meno tatuaggi.
Nota: pratica e pazienza ti aiuteranno a ottenere immagini migliori su tutti i tipi di pelle. Continua a provare diverse impostazioni finché non trovi quella che funziona meglio.
Prendersi cura del proprio rilevatore di vene a proiezione aiuta a ottenere immagini nitide. Una manutenzione regolare ne prolunga la durata e ne migliora il funzionamento. È possibile prevenire molti problemi seguendo una semplice routine.
Si consiglia di pulire il dispositivo dopo ogni utilizzo. Polvere, impronte digitali e macchie possono ostruire l'obiettivo, peggiorando la qualità dell'immagine. Utilizzare un panno morbido che non lasci pelucchi per pulire l'obiettivo e il corpo dello schermo. Non utilizzare prodotti chimici aggressivi o oggetti ruvidi, poiché potrebbero graffiare la superficie.
Controlla spesso il tuo dispositivo. Verifica la presenza di crepe, parti allentate o segni di danneggiamento. Controlla il vano batteria e la porta di ricarica. Se noti danni, informa subito qualcuno. Un controllo rapido può prevenire problemi più gravi in futuro.
Lista di controllo per la pulizia e l'ispezione:
Suggerimento: imposta un promemoria per controllare il tuo dispositivo all'inizio di ogni turno. Questa abitudine manterrà il tuo dispositivo pronto all'uso.
A volte i produttori forniscono aggiornamenti software o firmware. Questi aggiornamenti risolvono problemi e aggiungono nuove funzionalità. È consigliabile controllare gli aggiornamenti ogni mese. I nuovi software aiutano il dispositivo a funzionare meglio e offrono immagini più nitide.
Segui i passaggi indicati nel manuale utente per aggiornare il dispositivo. La maggior parte degli aggiornamenti richiede solo pochi minuti. Utilizza sempre il sito web o l'app ufficiale per scaricare gli aggiornamenti. Questo proteggerà il tuo dispositivo dai virus.
| Attività di manutenzione | Quante volte? | Perché è importante |
|---|---|---|
| Pulisci e ispeziona | Dopo ogni utilizzo | Previene i problemi di immagine |
| Aggiornamenti software | Ogni mese | Migliora le prestazioni e la sicurezza |
Nota: una manutenzione regolare ti fa risparmiare tempo e ti aiuta a fornire un'assistenza migliore ai tuoi pazienti.
È possibile ottenere immagini venose nitide seguendo le buone pratiche. Pulire il dispositivo prima di utilizzarlo. Assicurarsi che il paziente sia pronto e a suo agio. Utilizzare la tecnica corretta ogni volta. Risolvere rapidamente i problemi e prendersi cura del dispositivo spesso. Questo aiuta a ottenere risultati ottimali a lungo termine. Studi clinici dimostrano che alcune caratteristiche sono importanti da considerare:
| Aspetto chiave | Migliori pratiche |
|---|---|
| Tecnologia di proiezione | Per i pazienti con pelle scura, scegliere immagini ad alta risoluzione. |
| Caratteristiche | La luminosità regolabile, le modalità colore e gli indicatori di profondità ti aiutano a lavorare meglio. |
| Facilità d'uso | Scegli dispositivi facili da usare. |
| Durata della batteria | La batteria a lunga durata ti consente di lavorare senza interruzioni. |
| Portabilità | I dispositivi luminosi sono facili da trasportare da una stanza all'altra. |
| Prezzo e supporto | Una buona garanzia e un buon supporto rendono il dispositivo più affidabile. |
Utilizzare sempre gli stessi passaggi per aiutare ogni paziente a sentirsi sicuro e a suo agio.
È consigliabile calibrare il dispositivo all'inizio di ogni turno o dopo averlo spostato in una nuova sede. Una calibrazione regolare aiuta a ottenere immagini venose precise e chiare.
Sì, è possibile utilizzare un rilevatore di vene a proiezione sui bambini. Molti dispositivi hanno una luminosità regolabile. Questa funzione aiuta a vedere le piccole vene nei pazienti più piccoli senza causare disagio.
Per prima cosa, pulisci l'obiettivo con un panno morbido. Controlla la distanza e l'angolazione del dispositivo. Assicurati che la batteria sia carica. Questi passaggi solitamente risolvono il problema delle immagini sfocate.
È possibile utilizzare in sicurezza i rilevatori di vene a proiezione su tutti i tipi di pelle. Regolare la luminosità e l'angolazione per risultati ottimali. La pratica aiuta a ottenere immagini nitide sia su pelli chiare che scure.
Lasciate un messaggio
Scansione su WhatsApp :


 IPv6 RETE SUPPORTATA